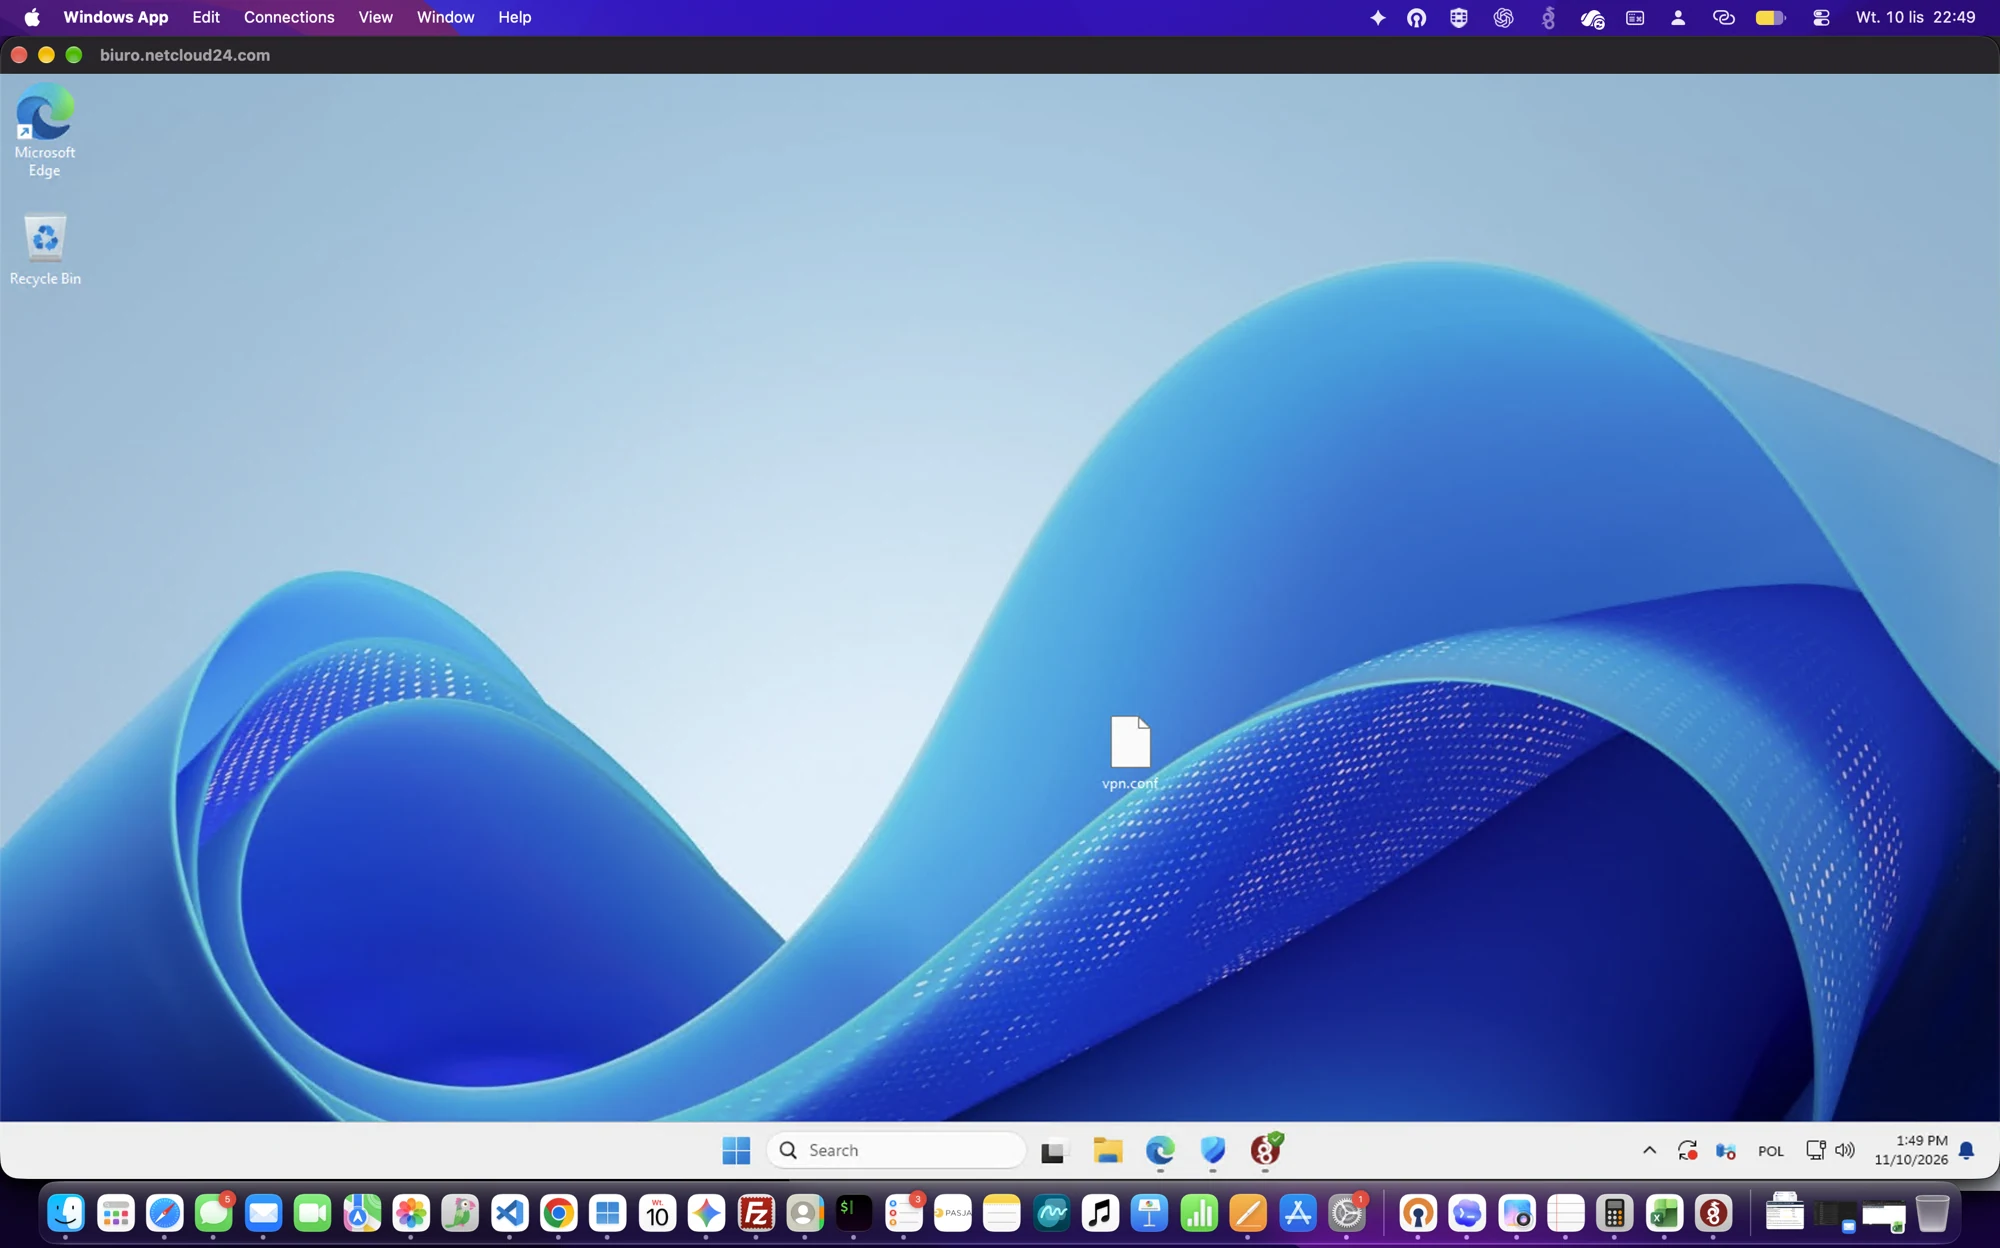
A Mac can display your prepared Windows business desktop while macOS remains your local operating system. The connection has two stages: WireGuard opens the supplied private network route, then Microsoft's Windows App opens the Windows session. You use your Mac to control the remote applications; you do not install Windows Server on it.
Netcloud24 manages the environment from A to Z, including the agreed server preparation, user access and onboarding. Your part is to apply the supplied connection profile and sign in with your own Windows account. The images show the relevant client controls; the WireGuard examples labelled as illustrations are not configuration values to copy.
Have the right applications and service details ready
Use a supported, updated macOS device approved for company work. Obtain WireGuard through the official Mac App Store route linked by the WireGuard project, and obtain Windows App from Microsoft's supported distribution route. They serve separate purposes and both may be required for the access design.
Prepare your customer-area access, device-specific WireGuard download and assigned Windows credentials. Your Apple account, Netcloud24 panel account and remote Windows account are distinct identities. The remote server does not necessarily accept the password you use to unlock your Mac or sign in to Microsoft 365.
If your organisation deploys applications centrally, ask its device administrator to provide the clients. Do not bypass a managed Mac's installation restrictions. Once the applications are available, you only need the prepared access details, not server administrator rights.
Download the Mac's supplied profile
Open the Netcloud24 customer area, select your VPS service and find VPN access. Expand Download your VPN profiles and download the WireGuard configuration for this device. Record the separate RDP address and Windows username displayed with the service.
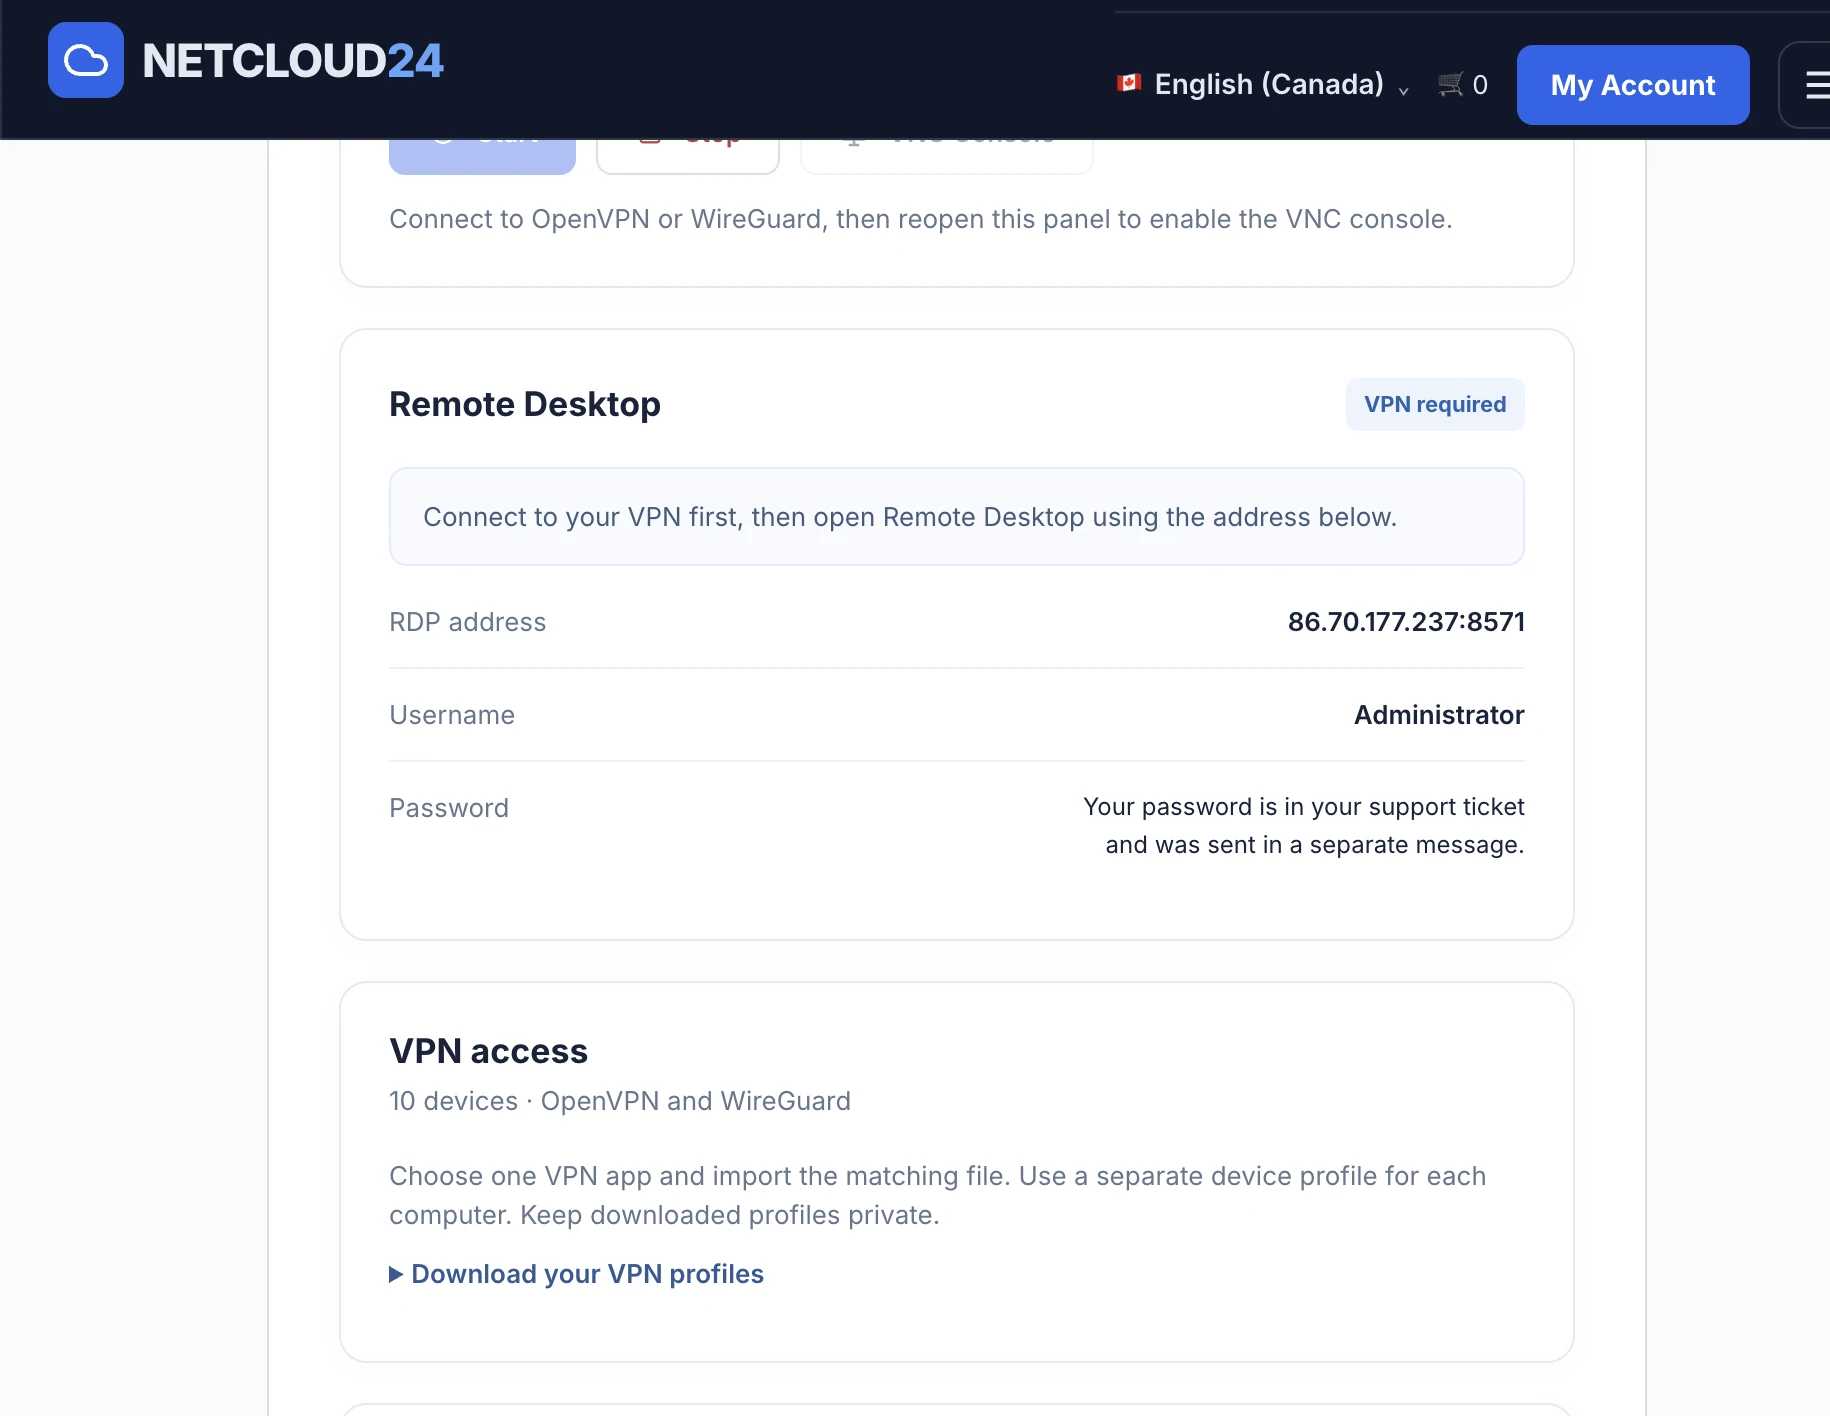
Choose the correct file format if the panel also offers OpenVPN. Keep the downloaded profile confidential because it may contain private key material. Do not give one colleague's profile to another colleague or copy it onto several devices instead of requesting the intended device access.
Install and open WireGuard on macOS
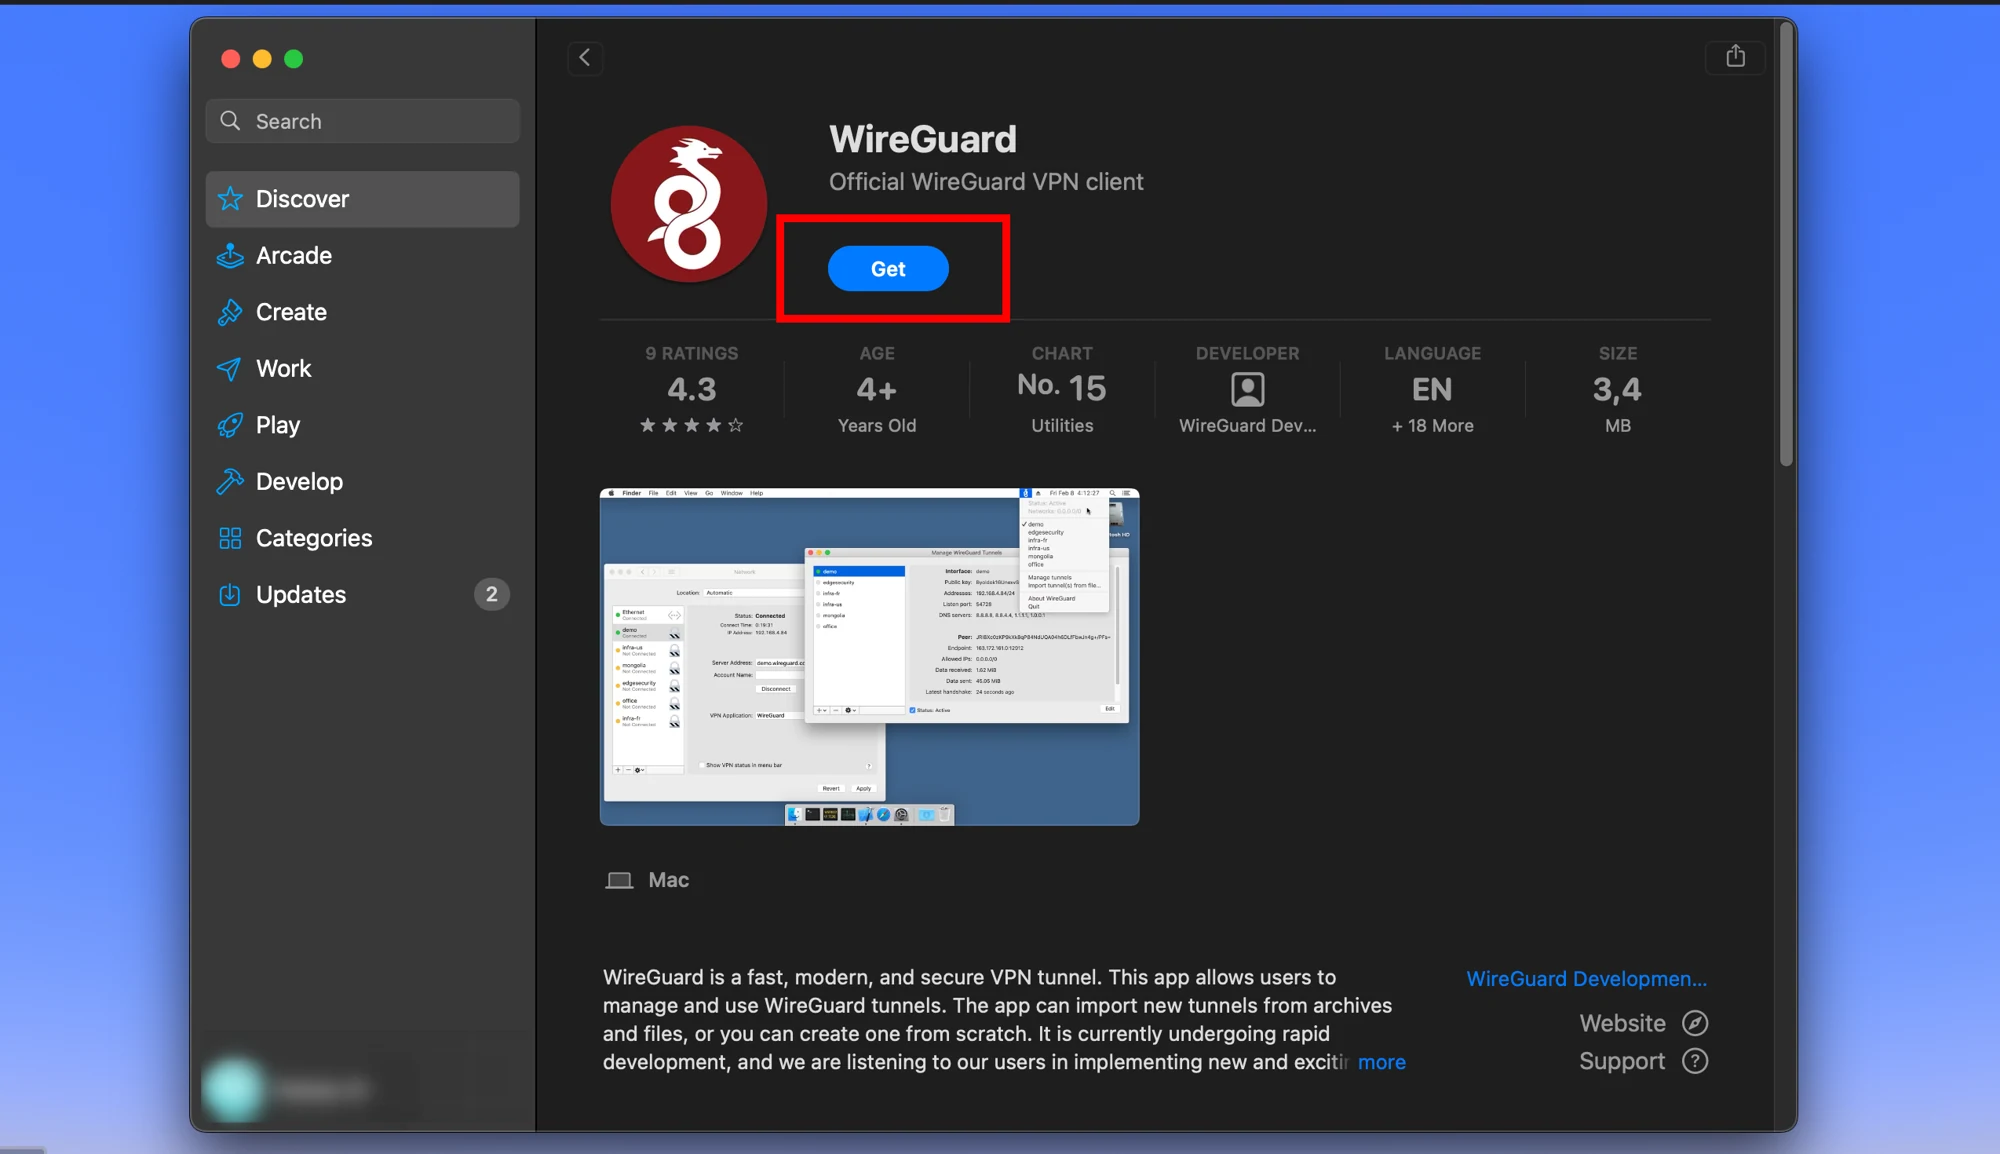
Install the official WireGuard VPN client. Verify the publisher and source rather than choosing an unrelated similarly named application. Follow any normal authorised installation prompts.
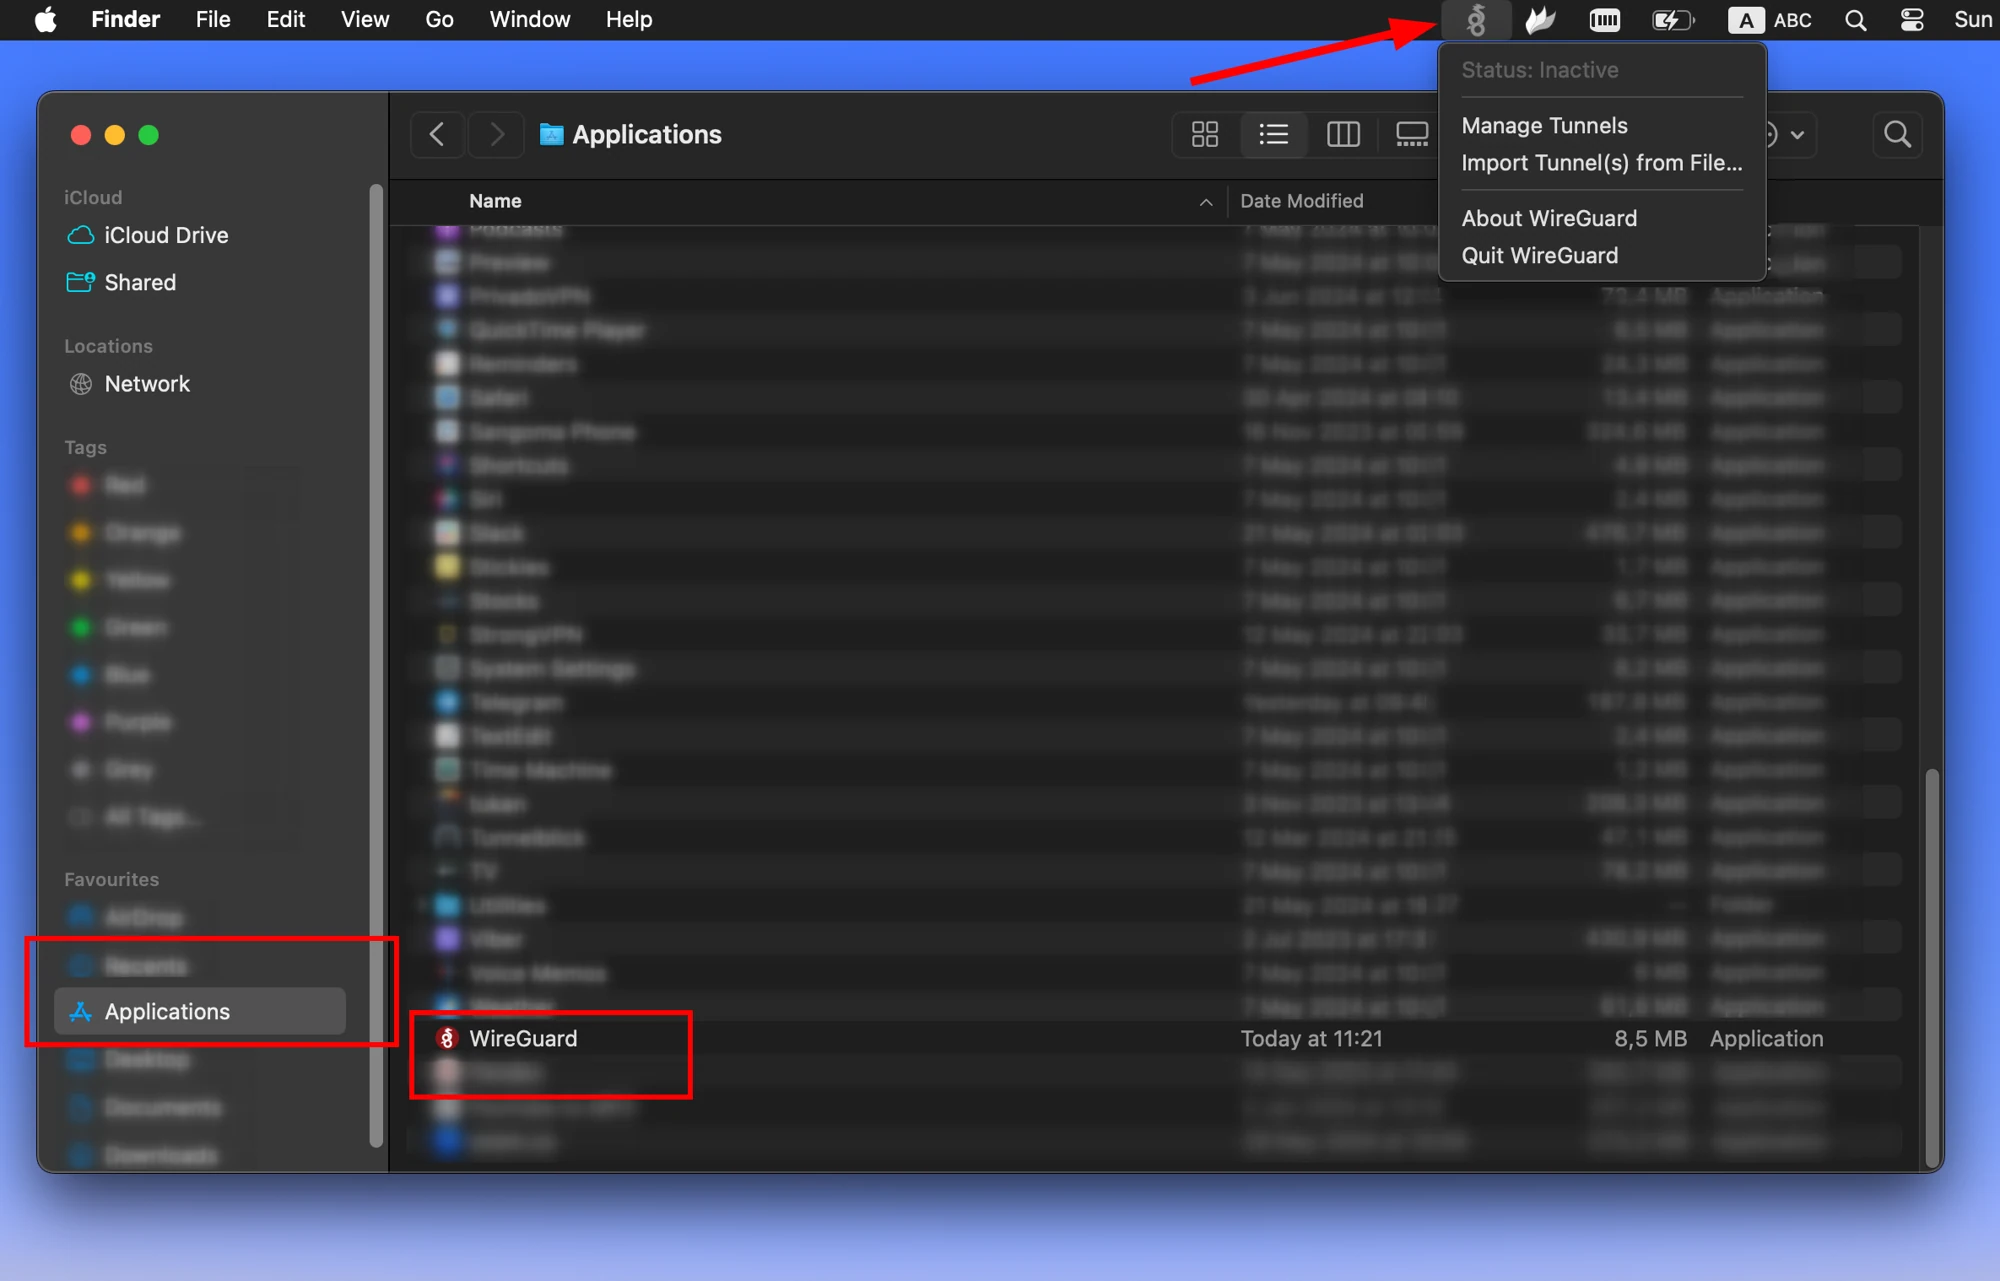
Open WireGuard. Depending on the app state, you may reach its tunnel list directly or use its menu-bar icon and Manage Tunnels control. Interface wording can vary as macOS and the application are updated.
Import the prepared configuration file
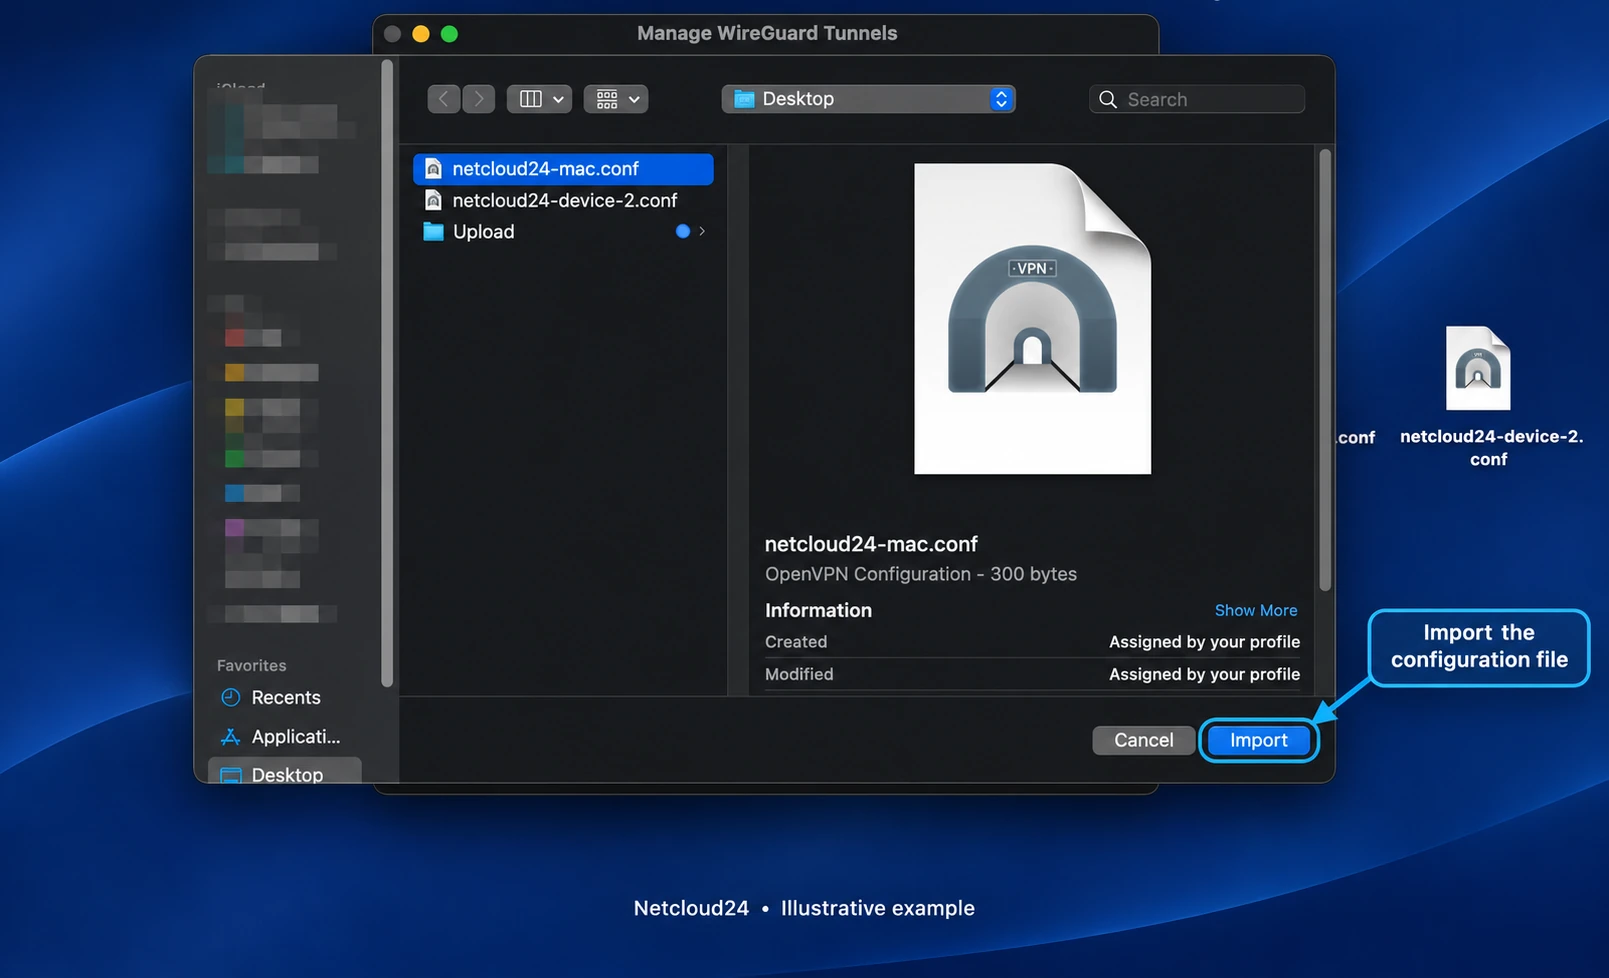
Select Import tunnels from file and locate the download belonging to this service and device. A filename is a useful label, but it is not proof that the file belongs to the current server, especially if you retain old downloads.
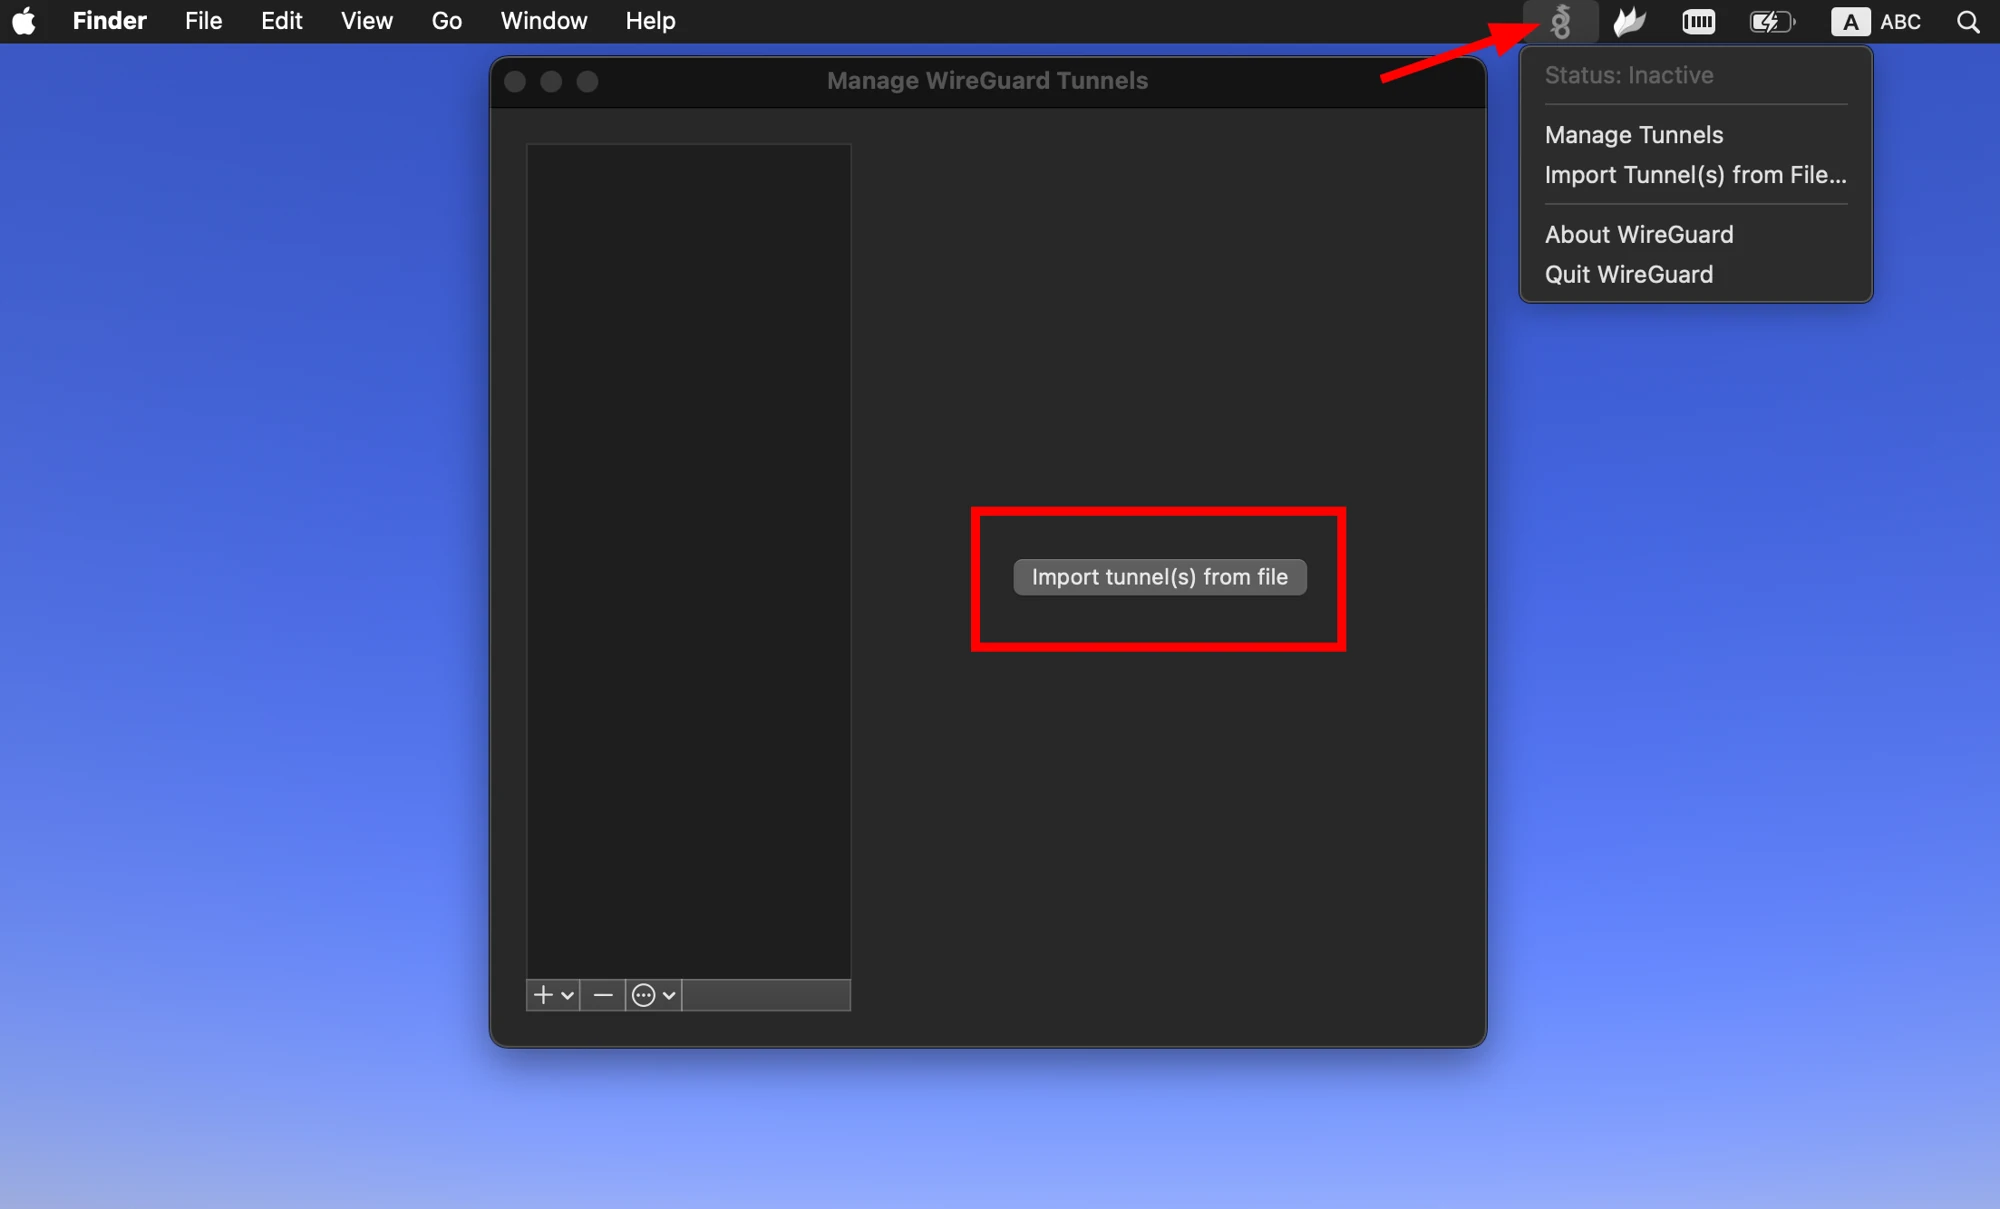
Select the supplied configuration. The illustrated import view below demonstrates the control, not a requirement to rename your file to the example name.
macOS may ask permission for WireGuard to add VPN configurations. Approve the expected prompt if it relates to the official client you installed and follows your organisation's device policy.
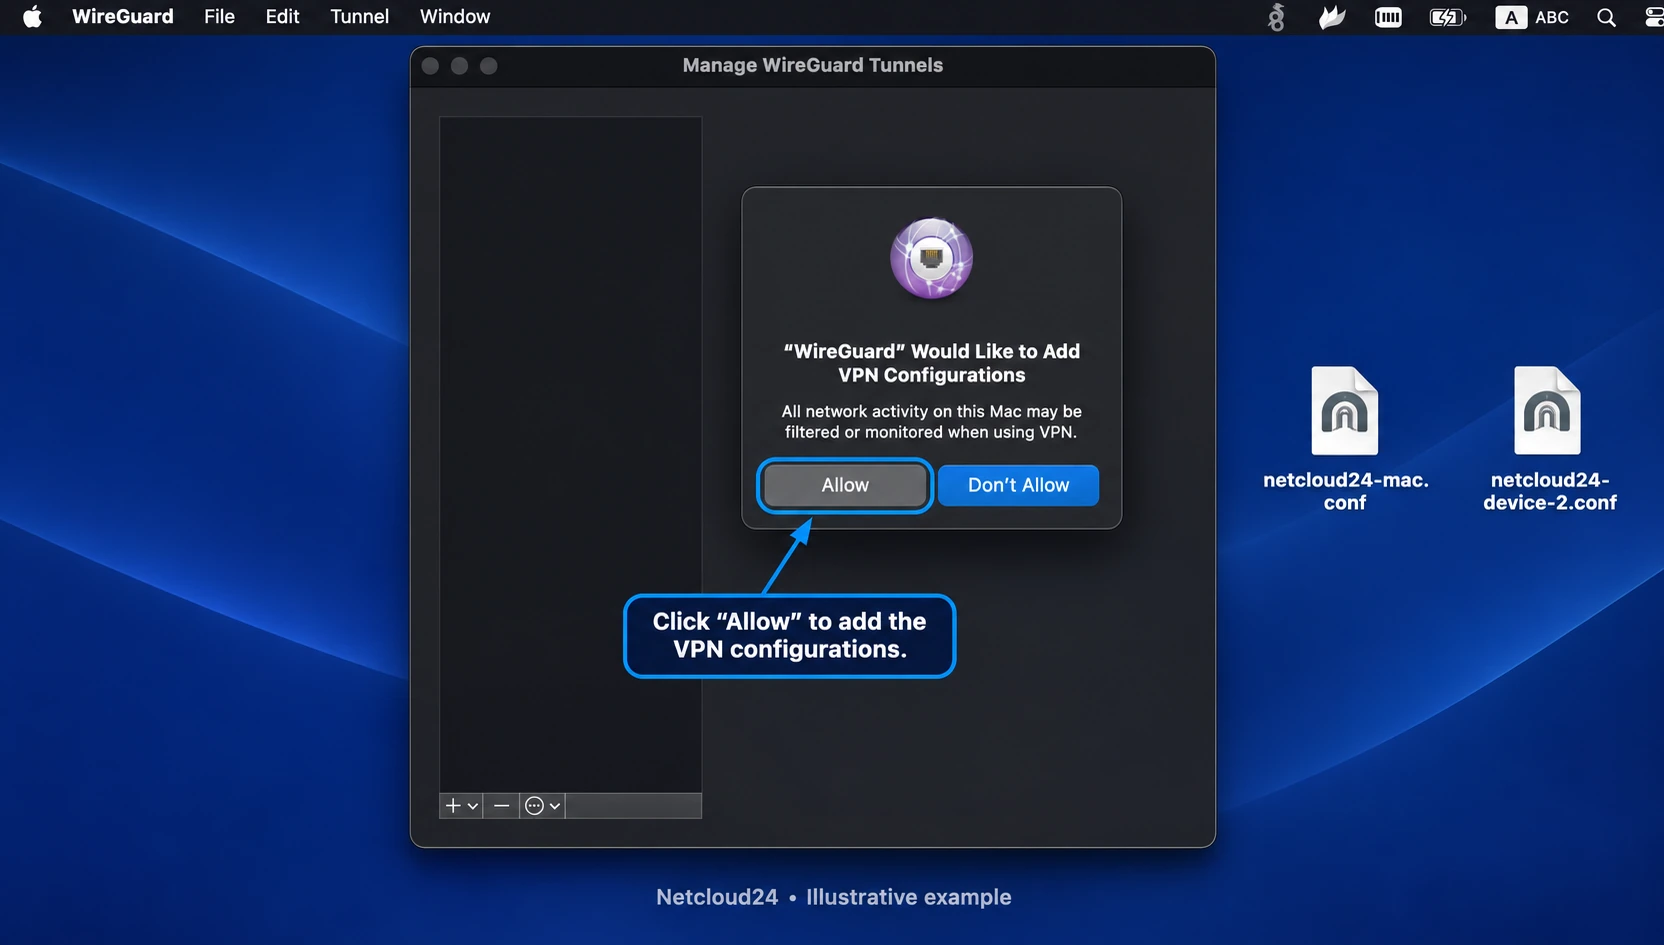
Do not create a new empty tunnel or edit its keys, endpoint and routing to resemble the pictures. Netcloud24 has already prepared those details. If import is rejected, retain the error and ask support to check the downloaded format or profile.
Switch on the supplied tunnel
Select your imported profile and activate it. Keep unrelated VPNs off unless your organisation has approved their simultaneous use, as competing routing or DNS arrangements can affect access.
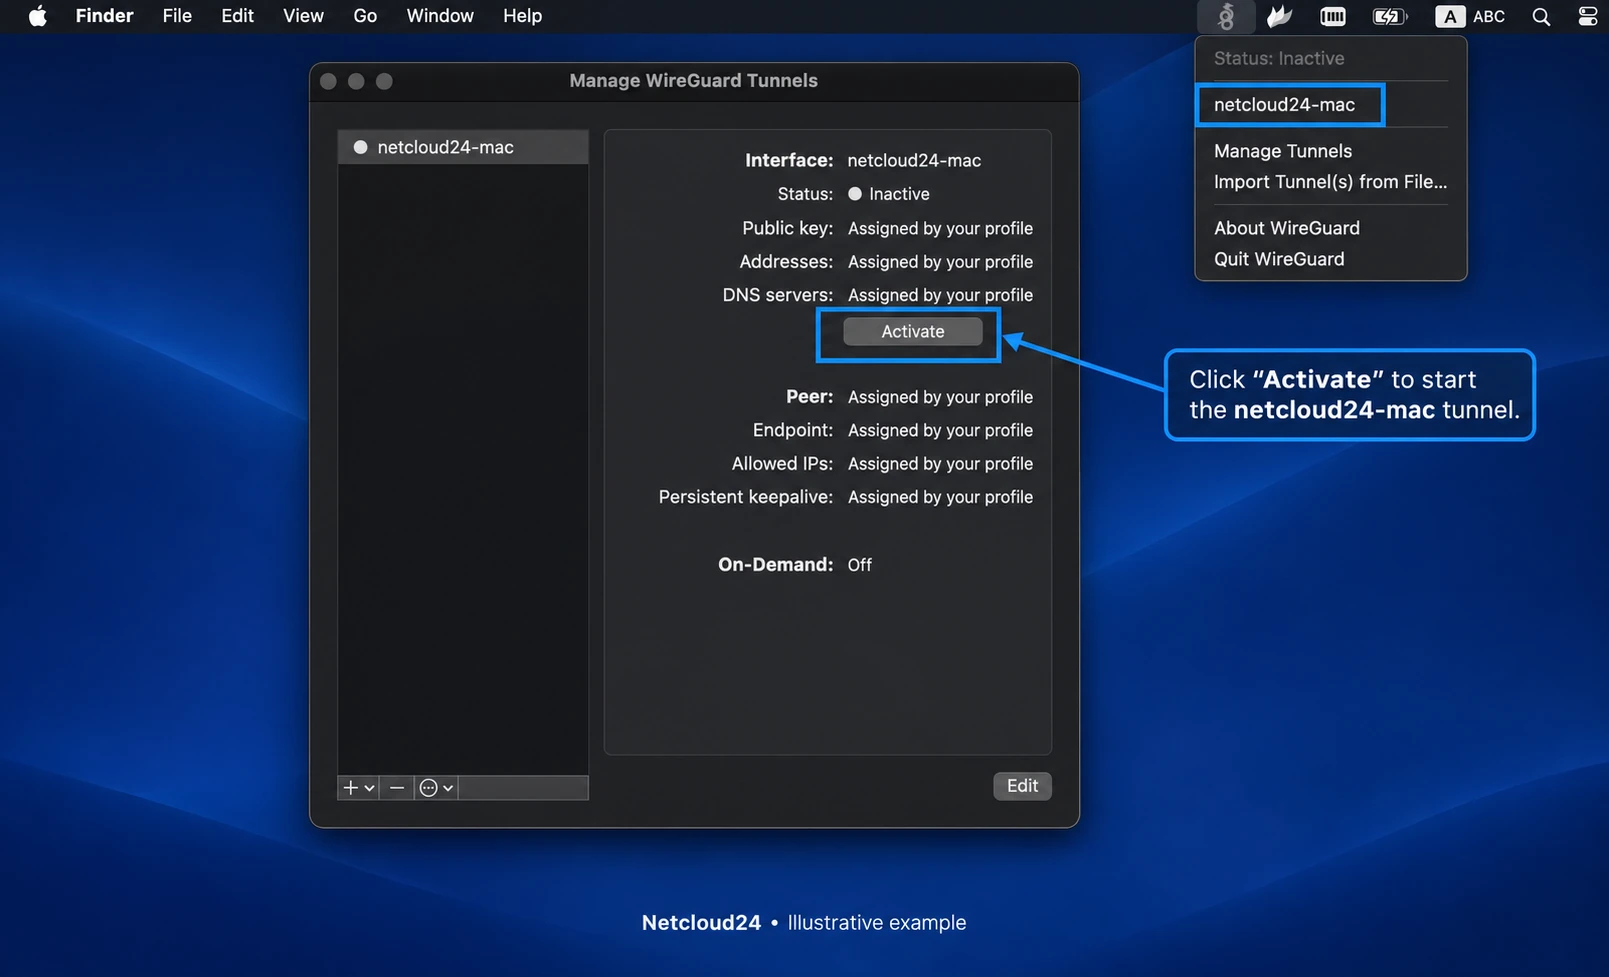
Check status and, where shown, recent peer communication or transfer counters. An enabled local tunnel and a usable route are different checks, so a status label alone is not the whole diagnosis.
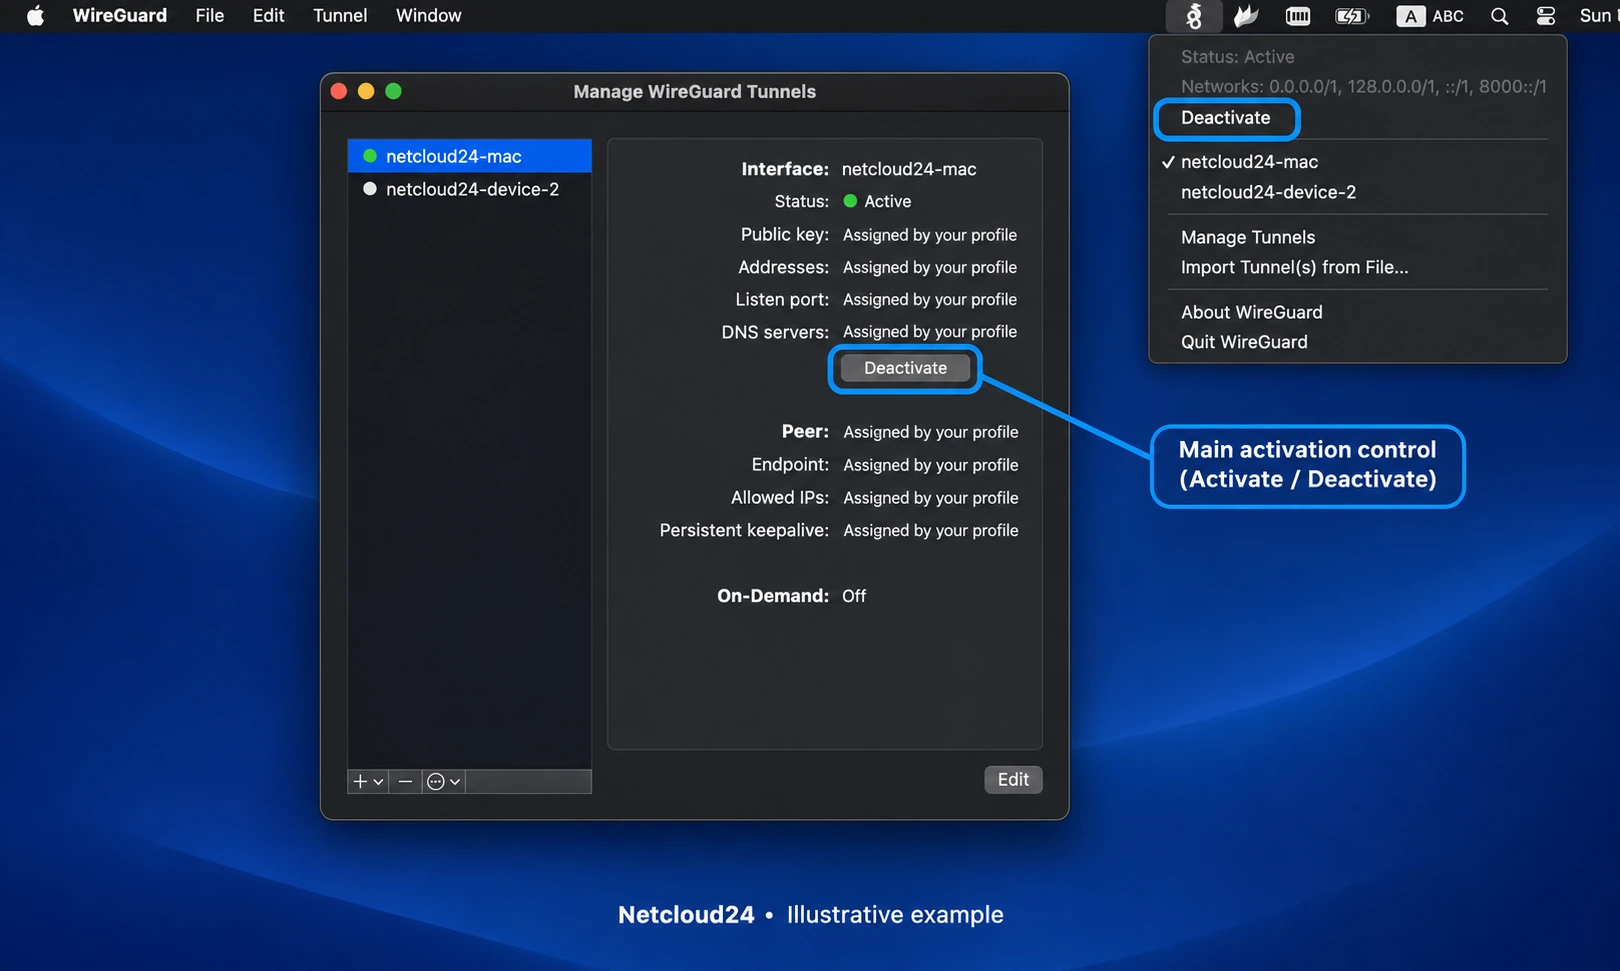
Keep this connection active when opening and using the Windows session. After a network change or sleep, check it again if remote access stops. Do not change the managed server's firewall or expose RDP publicly in response to a client-side connection problem.
Create the remote-PC entry in Windows App
Open Windows App and use the plus control, then Add PC. Enter the service's supplied RDP hostname or address in PC name. A friendly name can help identify the connection, but it does not replace the actual destination.
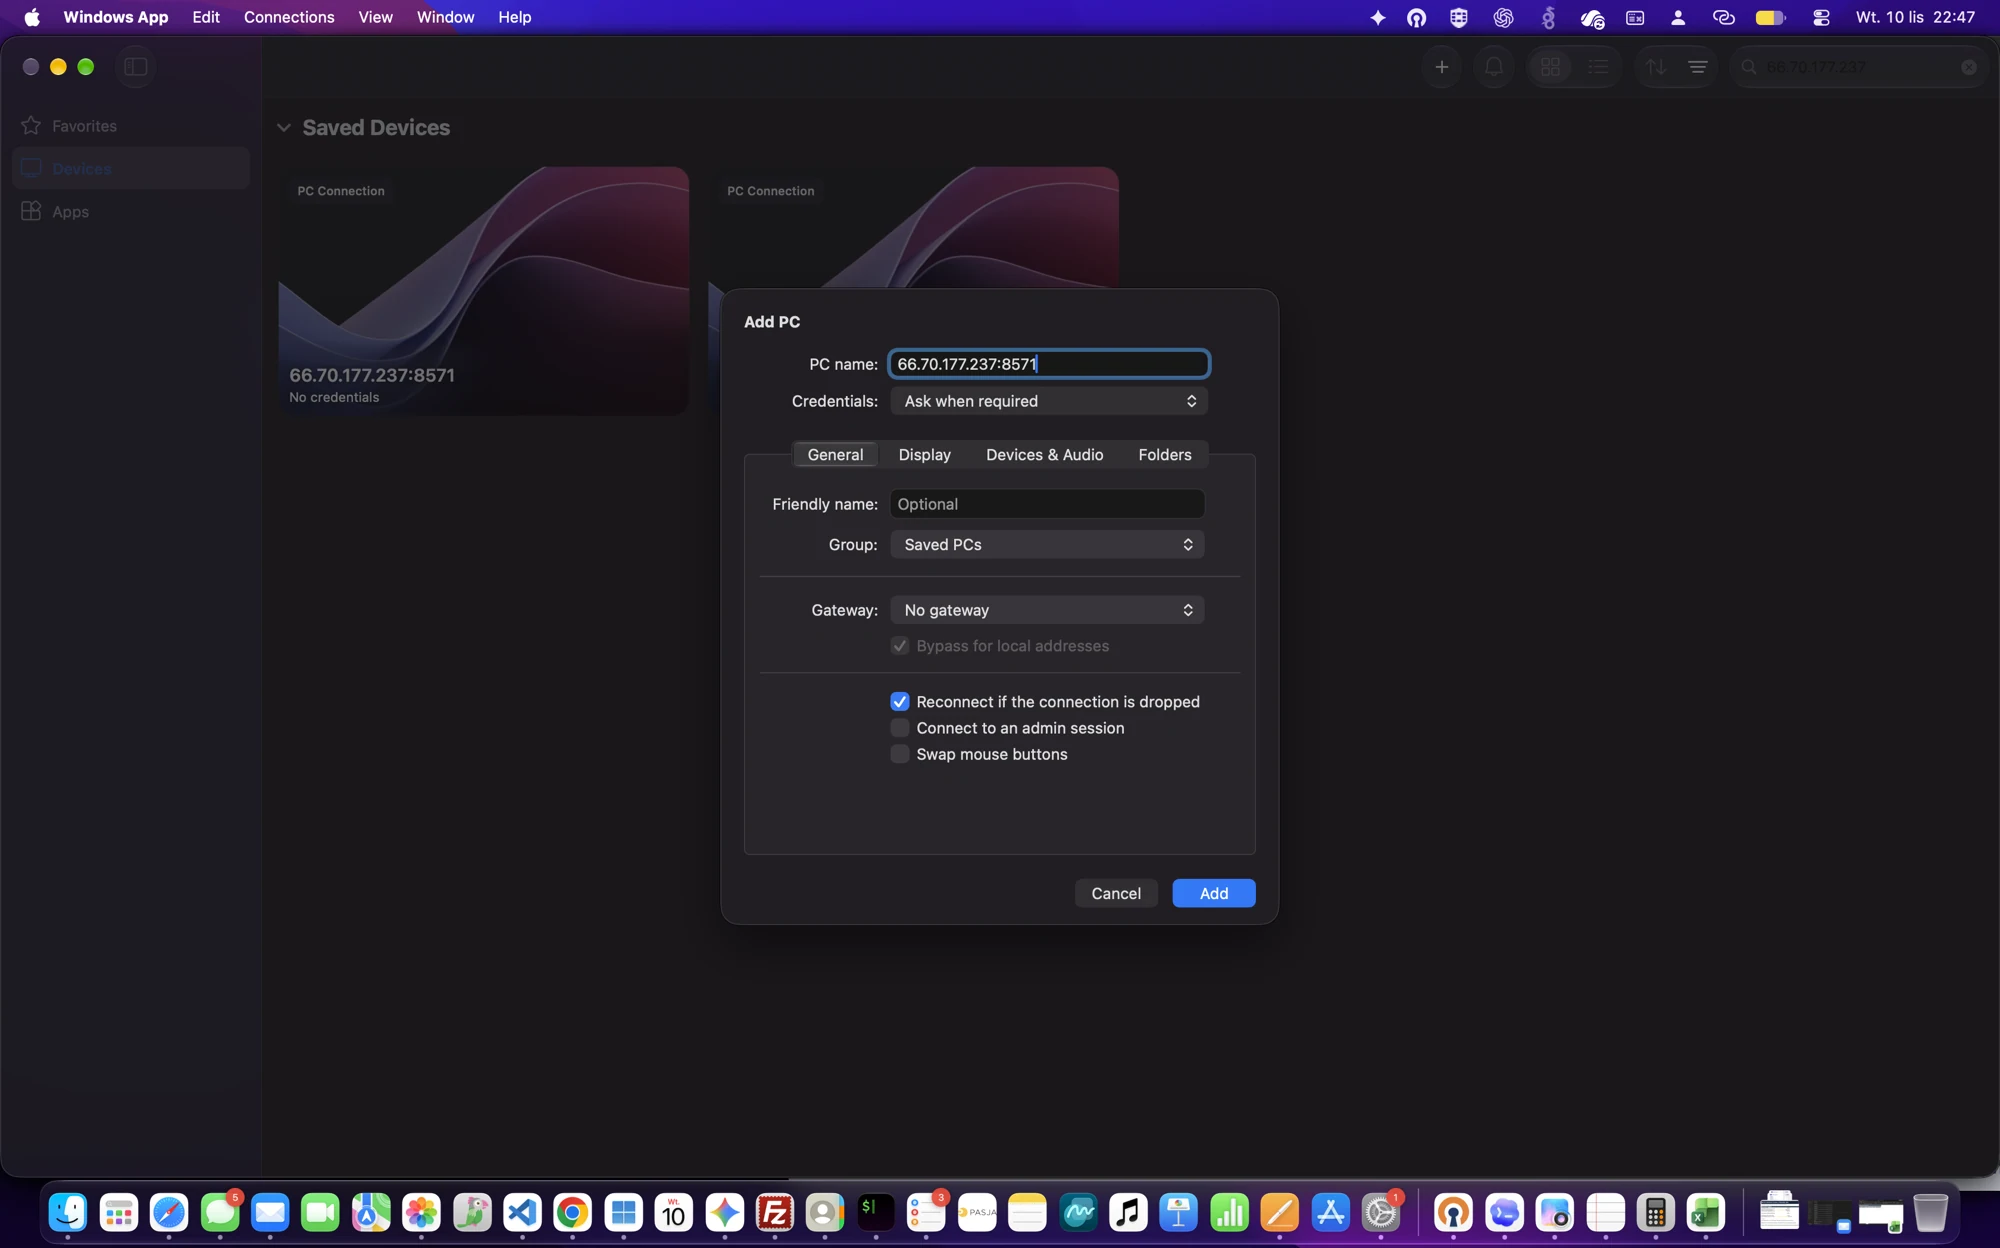
This guide follows a supplied direct remote-PC destination. Add Workspace is for a published workspace URL and should be used only when your handover specifically provides one. Do not guess a workspace address from the public website.
Review display, audio and local-resource settings against company policy. Sharing a Mac folder makes it accessible in the remote session under the permitted arrangement; it is not automatically a backed-up company share or a full synchronisation service.
Open the connection and authenticate
Save the entry and open it from the device list. Supply the individual Windows username and password assigned to you. Include any supplied domain prefix and choose a different account if an unrelated stored credential appears.
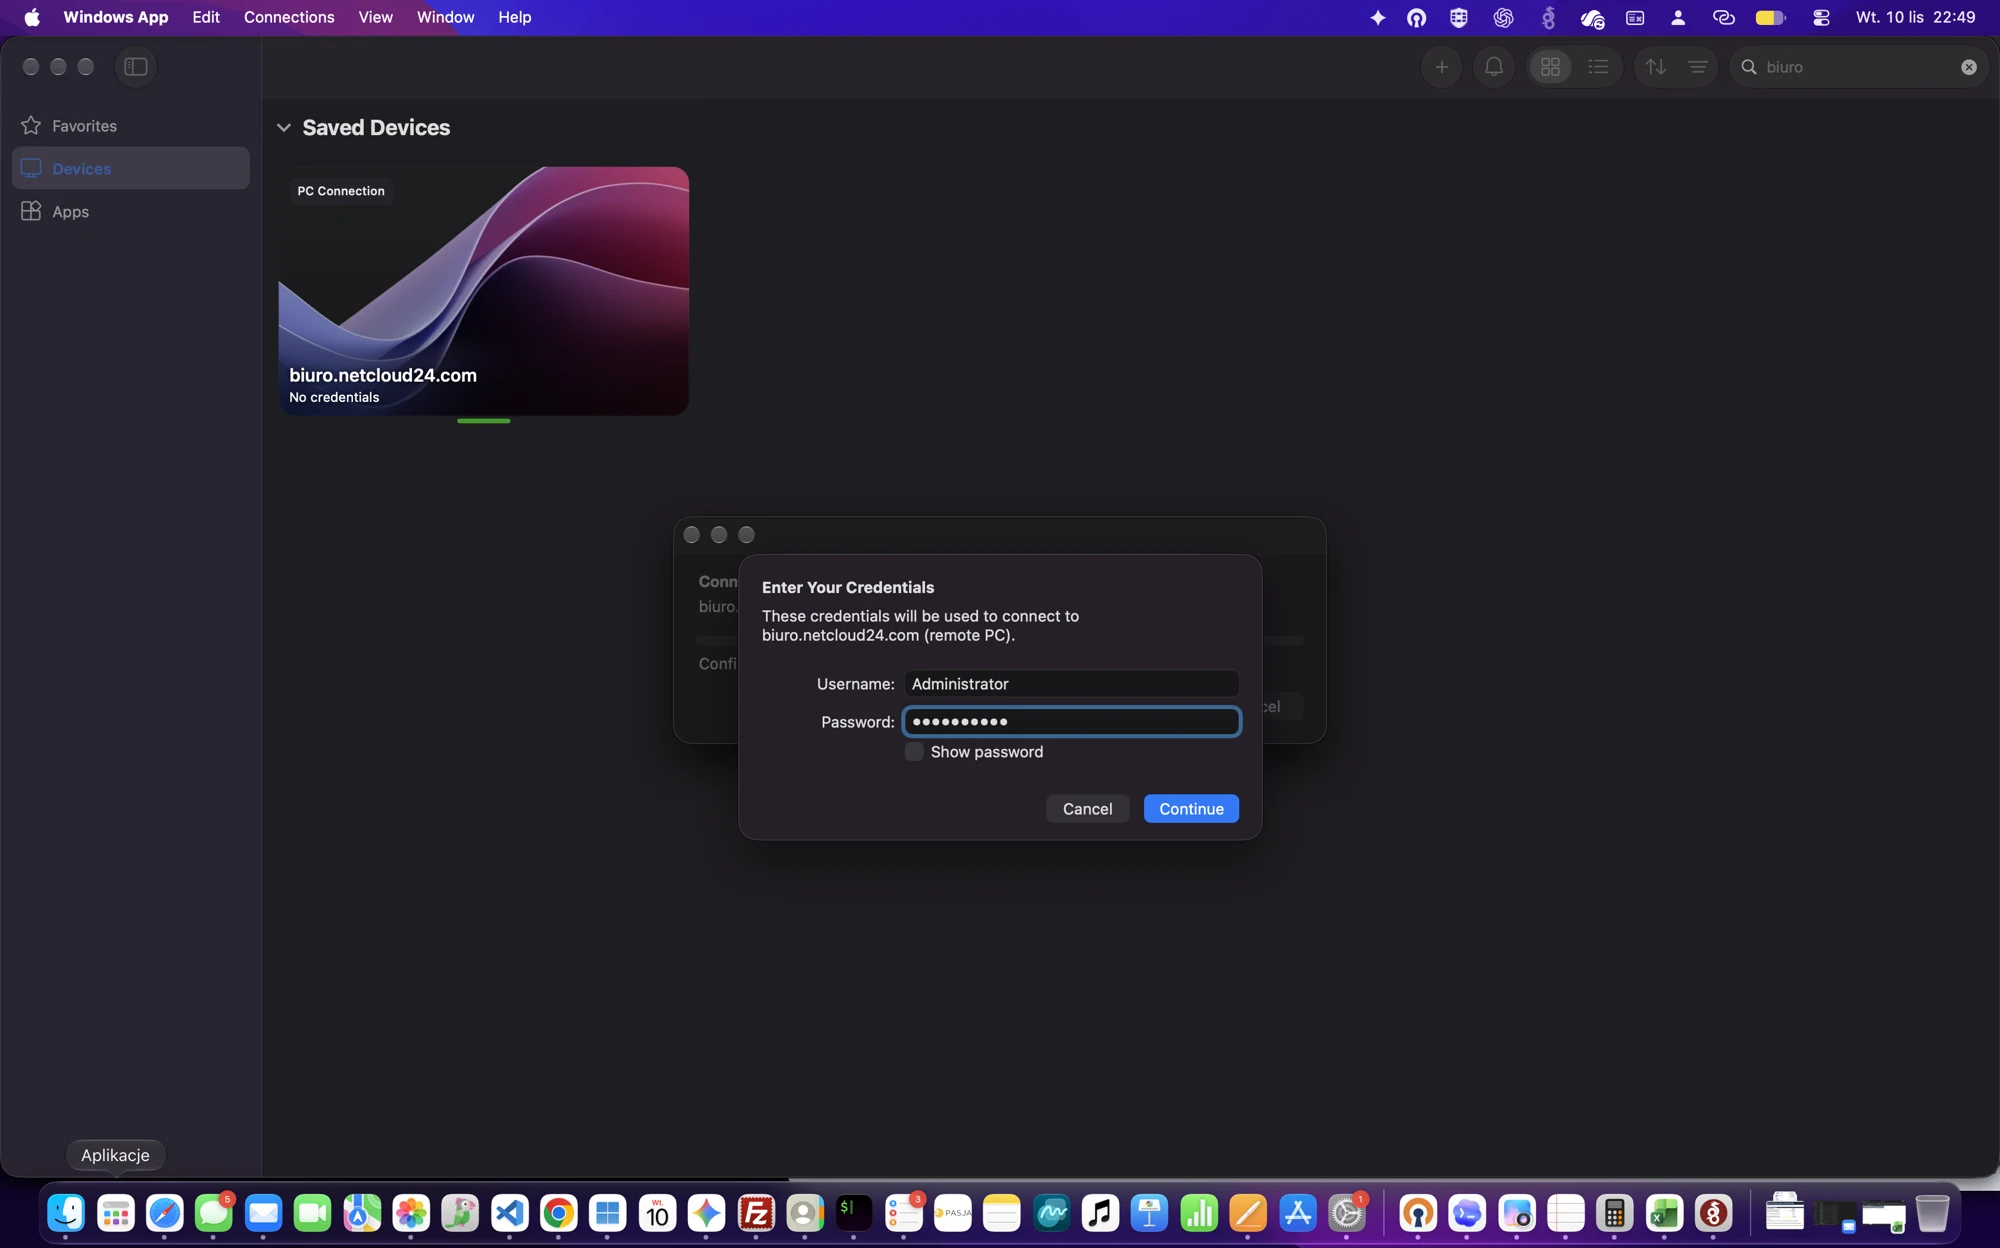
Use password storage only on a trusted device where your organisation allows it. A failed sign-in should be checked for typing layout, account format and destination before repeated attempts trigger a lockout.
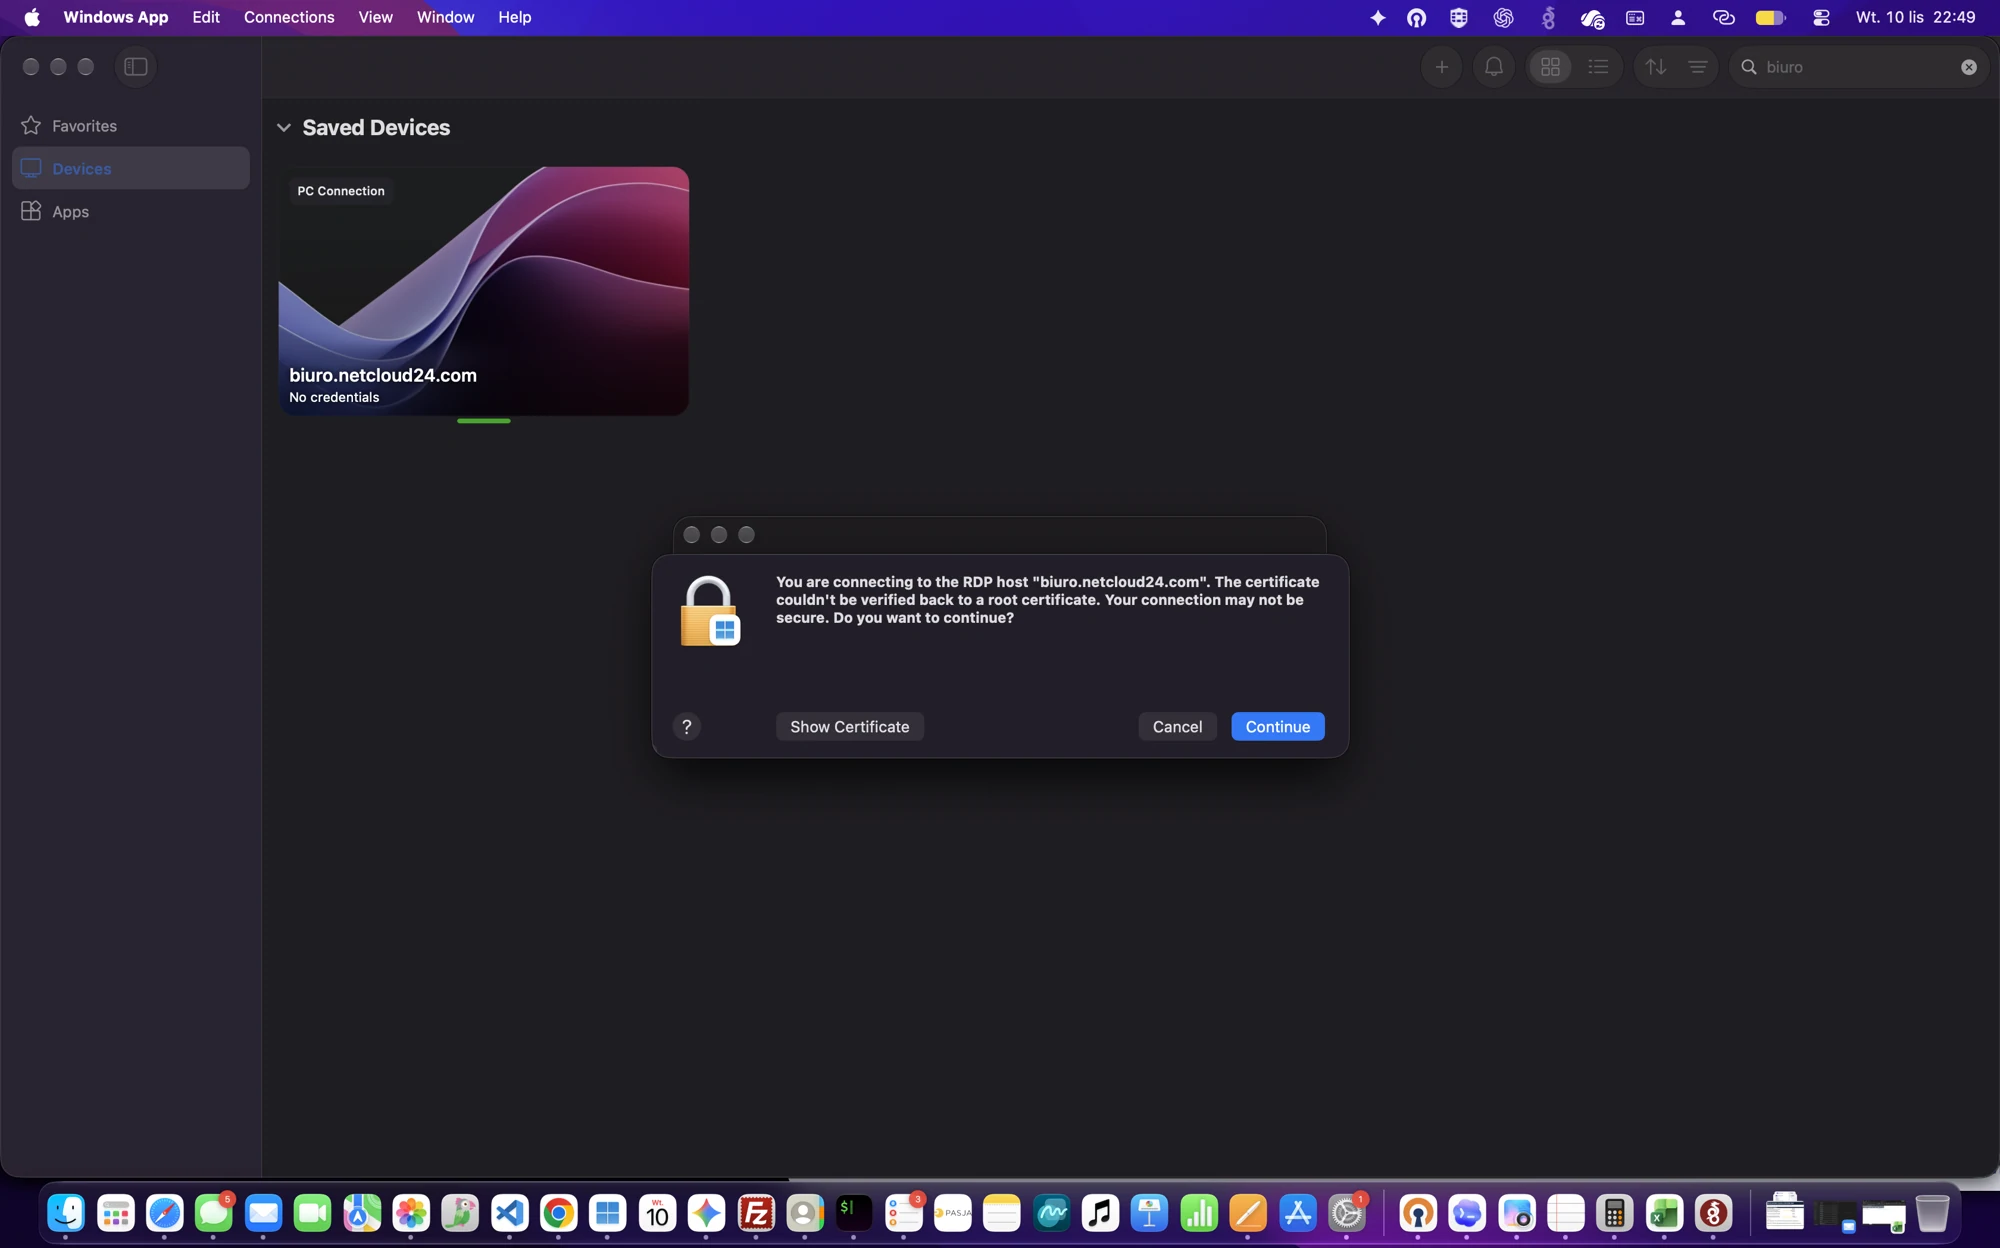
If Windows App cannot verify the server certificate, check the identity through the service information or support. Do not treat every warning as a normal button to dismiss.
Check the remote workplace before starting live work
A connected Windows desktop appears inside Windows App. Confirm the expected account, business software and company data locations. The window boundary distinguishes the server environment from your own Mac.

Try an approved harmless operation, such as opening the application's usual start page or reading a known shared document. Ask support about missing permissions rather than moving company data into a personal Mac folder as a workaround.
Some keyboard shortcuts are handled locally and others by the remote client. Use Windows App's supported keyboard and session controls where a Mac shortcut does not have the expected Windows result. Request help with the exact shortcut and application instead of changing server keyboard settings blindly.
Leave the session safely and report the right evidence
Save your work and use Windows sign-out when you intend to close applications. Closing the client normally disconnects and can leave work running according to the managed timeout policy. Disconnecting WireGuard while still working will also interrupt the access path.
For help, provide the stage reached, macOS and client versions, approximate time and the exact message, keeping passwords and profile contents private. Microsoft documents Windows App connection options. Colleagues using PCs can follow the Windows VPN guide, while the team workspace guide explains individual sessions.
 Preparing RRAS for an agreed Windows Server gateway role
Prepare RRAS by choosing its gateway purpose, verifying platform support and interface design, installing only needed services, and testing…
 Providing controlled outbound IPv4 access with RRAS NAT
Configure traditional RRAS outbound NAT from the client’s full route, assign deliberate interface roles, verify actual translations and…
 Building a certificate-validated IKEv2 remote-access service
Design an IKEv2 service around gateway and EAP certificate validation, narrow NPS authorisation, managed client provisioning and external…
 Connecting two routed sites through an RRAS IKEv2 interface
Connect two sites using an RRAS IKEv2 interface with machine certificates, complementary subnet routes and matched responder policy, then…
 Introducing NPS as a controlled RADIUS authority
Introduce NPS with distinct AD registration and RADIUS peer trust, narrow policy matching, current integrity and certificate requirements,…